Product Details
-
Cast iron platform flat series
-
Marble measuring tool
-
3D welding platform
-
Square box/bending plate
-
Series of cast iron flat ruler
-
V-frame series
-
Magnesium aluminum measuring tool
-
Skew instrument series
-
Plug ring gauge series
-
Machine tool pad iron series
-
Machine tool casting series
-
Counterweight iron series
-
Cast iron flooring
-
Ground rail series
-
Special wrench series
-
Other series
-
Machine tool inspection measuring tools
-
Haval Festival series
-
Valve series
-
Casting

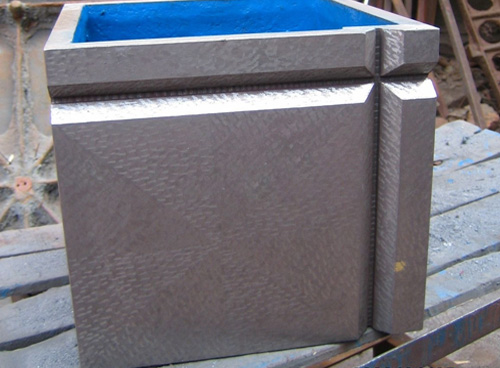
Marking square box
The marking square box is mainly used for checking the parallelism and verticality of components and supporting workpieces during marking.It is generally a square or rectangular body with the same side length.Various specifications and equal height square boxes and rectangular cylinders can be made according to user requirements.Manufacturing according to JB/T3411.56-99 standard,material HT200.A square box is a specific six working face cavity cube made of cast iron,with a V-shaped groove on one of the working faces.The environmental conditions for square box calibration are normal temperature and humidity.For the scraping development of the square box,in addition to verifying the flatness,the contact spot should also be verified using the coloring method.The number of spots in any square with a side length of 25mm is:no less than 25 points for level 1 and level 2;Level 3 with no less than 20 points.
The usage requirements of the marked square box:Each working surface of the square box must not have rust,scratches,cracks,dents,or other defects that affect the measurement performance.Non working surfaces should be sandblasted and painted with chamfered edges.There should be a label on the inner wall of the square box,indicating the specifications,dimensions,level,factory number,and manufacturer name.
Detection method for marking square boxes:
For square boxes with a side length of 300mm and below,a 1mm gauge block is placed at both ends of the inspected surface during the calibration process.A knife edge ruler is placed on the working surface of the gauge block,and then a gauge block is used to test the plug at each inspected point.The difference between the size of the equivalent block group when just inserted and the size of the gauge blocks at both ends is the deviation between the inspected point and the two ends.This calibration should also be carried out on several cross-sections of the square box working surface in the longitudinal,transverse,and diagonal directions.When the error direction in the measured straight lines at each position is consistent,the maximum value is taken.When the error direction is inconsistent,the sum of its large positive and large negative differences is taken as the flatness of the tested surface plane.
 NEWS
NEWS
-
The main function of welding platforms
2022-09-08 05:40:39
-
Measures for maintenance and upkeep of the marking platform
2022-09-08 05:39:16
-
Reference plane inspection and application of cast iron platforms
2021-01-24 11:20:22
-
The centralized method and measurement inspection method for installing cast iro
2021-01-20 09:21:17
-
How to Reasonably Design Reinforced Ribs for Cast Iron Platforms
2021-01-19 09:51:22
 CONTACT
—— E-mail:326673342@qq.com
—— Tel/Fax:+86-0317-8383389
—— Phone:+86-18603177396
—— Address:Linzhuang, Haocun Town, Botou City, Hebei Province


